 |
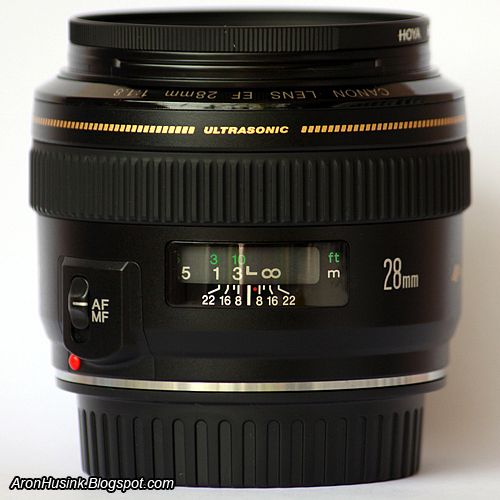
| Canon EF 28mm f/1.8 USM with rear lens cap and Hoya UV HMC (c) 58mm filter |
This is not a complete review, but after using this favourite - 90% of the time mounted on my 50D - lens for almost a year, I think there are many things that I can share about this lens.
Why I bought this lens?
My first lens was an EF-S 18-55mm II kit lens, it suffers me with its small aperture and hence the need for long exposure and/or high ISO when shooting in low light indoor. And since I bring my camera almost everywhere (some pro-photographer said to bring your camera wherever you go, that is one way to improve your photography), including when going out with my friends to malls or restaurants, I'll often shoot in low light indoor condition, and that was why at first I decided to hunt for a large aperture lens.
I had four candidates at that time, those are this lens (The most expensive of all candidates), the EF 28mm f/2.8 (Cheaper version of the lens), the EF 35mm f/2, and the cheapo 50mm 1.8 (Which I eventually bought too). Because I was looking for a replacement of my kit lens, I needed a lens would gave me a more of less normal angle of view - equal to 50mm in a full frame (FF) camera, and that would automatically exclude the cheapo 50mm - equal to 80mm if mounted on 1.6X crop camera. The choices were down to 28mm (44.8mm on FF) or 35mm (57.6mm on FF). I decided to go with 28mm, because 28 mm has a more pronounced wide angle focal distortion (I will make a dedicated article explaining this stuff) which will give me a chance for more creativity, compare to a flatter perspective - less focal distortion and hence boring - of 35mm.
After deciding that I'll go with a 28mm lens, it's time to determined how large the aperture that I'll need. So I do the math, I take a picture under a dim light (where I expect I'll shoot a lot in) with my kit lens, and make a calculation of how the high ISO or how long the exposure time that I'll need at f/2.8. I then conclude that f/2.8 isn't enough for me, that's why I go for the f/1.8.
Before buying it, I decided to do some research. I read a numerous amount of reviews, but eventually it was Mr. Rockwell's review that convinced me to go for this lens.
Am I happy with it after I get it?
The answer is YES. This lens is a lots lots of fun for many reason.
The most obvious reason is that I can shoot in any light with ease, and combined with my 50D's pleasant high ISO noise performance (Not as good as Canon's latest generation 18 mega pixels sensor, but still very nice) I never have to worry about my images noise level anymore. I just keep shooting and be happy because I know that my images are good.
The build quality and the mechanics are SUPERB. Excellent damping, no play at the focusing ring (better then 50mm f/1.4 USM, I've tested it). The metal mount fits perfectly with no play when mounted on my 50D (my kit lens on the contrary can be moved sideways easily when mounted). USM focusing is very fast, silent and smooth, combined with 50D's focusing capability makes me able focus even in a bad light condition (my 400D will just keep hunting and couldn't focus at all in an unfortunate condition). No extending barrel, means not a pumper lens which means less dust gets in it (but it isn't weather sealed, so dust still do gets in sometimes).
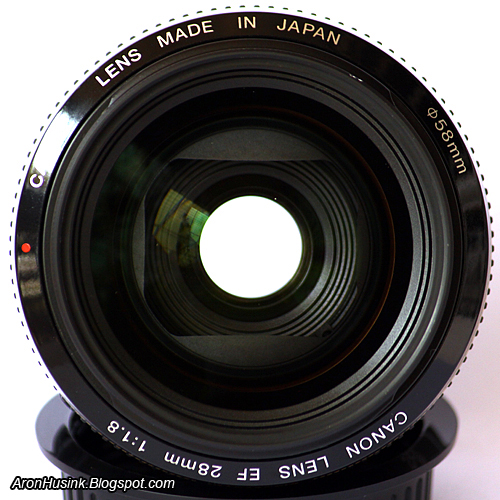 |
| Look at the internal rectangular flare stop, looks cool. Notice the green web-like reflection, it's my front yard haha. |
The focal length is very useful. I can make almost any kind of shooting that I could get with my 18-55mm, I personally think the logic behind choosing a fix focal length is to choose somewhere in the middle of the zoom range of what you used to shoot with. It's wide enough to make an indoor group portrait, you can certainly use it to make a half body portrait, and - if you push it - a tighter portrait shoot without ruining the subject's face shape.
This is as tight as it gets, try to get closer and the face will look even weirder, even at this range it isn't that pleasant, but still tolerable.
It certainly also serves nicely as a landscape lens. If it's too wide, I could easily crop it via photoshop. Plus, the focal distortion means that I could take a shoot with exaggerated depth, typical for a portrait landscape with a wide angle lens, and hence I don't miss my 18mm - wait, I lied, I still miss a wider focal length, but at least not that much. Check out my gallery, many of my images there were taken with this lens.
The focal distortion combined with a very large aperture means that I could isolate a small object with a still large bokeh-ish background. It is something that you can't do with a longer lens, because although they isolate the object better, they will also enlarge the background and hence blurred it even more. Here are some examples of what I mean.
 |
| Leaves from a coconut seed. |
See how the leaves came forward toward us, this is due to the focal distortion effect. And with large aperture, combined with the ability to focus very close, the distortion is exaggerated, and the DOF become very shallow, and hence the blurry background.
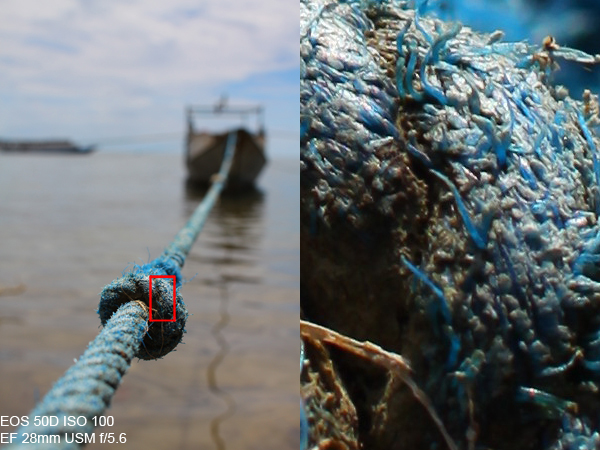
 |
| Knot of a rope that ties a boat |
I love this picture, because I could emphasize the insignificant knot with the help of the large aperture. If I was using a longer focal, it would make the boat appear larger, and lessen the deeper perspective of the rope, and at the earlier image, I would get viewer coconut seeds into my frame, and will produce an ordinary perspective image. Ordinary is boring.
What about sharpness?
See for yourself.
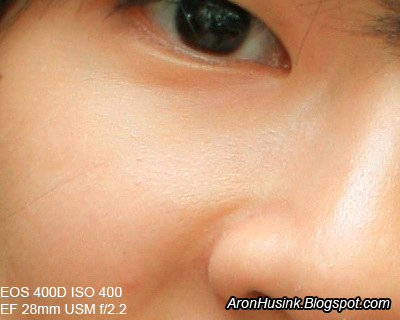 |
| 100% crop, no extra sharpening |
 |
| 100% crop, no extra sharpening |
Look at the skin pores from a not so sharp sensor of my old and sold 400D, and the amount of detail that I can pull out from such a small crop with my 15 mega pixels 50D. If I bother to sharpen it with photoshop smartsharpen tool, it would be much sharper. If I bother to shoot raw and sharpen it with Canon DPP, it would even much much sharper and cleaner.
Wanna go scientific with MTF chart? this lenstip.com review will tell.
Wide open at f/1.8 in a broad daylight, it will produce a glowy haze that make a soft image which is your own fault for shooting wide open at f/1.8 in a broad daylight.
Bokeh?
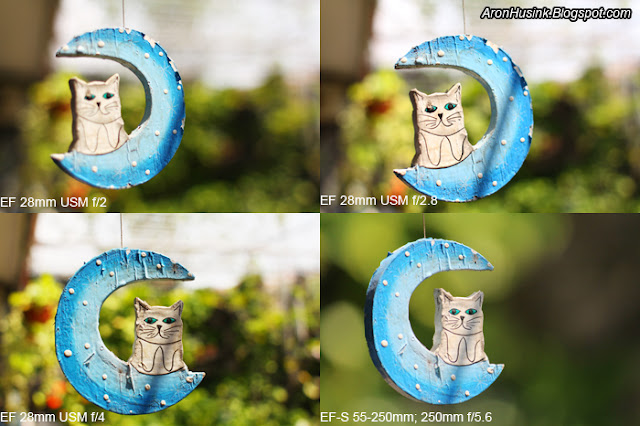
I use a less then 10 cm tall object with far background to emphasize bokeh. The object is dangling around by the wind blow so don't look at the sharpness. The bokeh is generally good, it only become harsh if you have a harsh and crowded background like my front yard. At f/2.8, the heptagonal shape starts to show. look at those two earlier pictures, they show smoother bokeh.
One of the things that I want to show in this comparison is that longer focal length will make a softer background, and hence better object isolation if that is what you wanted. Notice that with my tele zoom, the background is almost vanish. So want a portrait lens?Opt for longer focal length.
Extra: One other thing that this comparison shows by looking at the cat's face is that this lens has a better colours and contrast compare to a kit lens (In this case, a kit tele EF-S 55-250mm f/4-5.6 IS). I do noticed it, but I didn't make a dedicated comparison about it.
Fix instead of zoom?
My experience with fix lens is that I was first forced to zoom with my feet and by doing so, I became composition conscious. Every time I positioned myself and take a shoot, I became more critical with the result that I get. I was then forced to utilize what I got in my hand to make a better image, this is the very first advantage by using a fix lens to improve my photography.
The second advantage that I realize is that by using the same focal length for sometime, I became so accustomed with this lens specific focal distortion and angle of view, so that whenever I walk and see some interesting scenes or things, I know immediately how I would compose it. It becomes a reflex, so I could walk and shoot fast and effortlessly.
Not to mention that all those hardcore Leica shooters always use fix lens, so there is no reason for an SLR shooter not being able to do so.
Some article from Mr. Rockwell that tells the same thing, but in more detail.
Should you get this lens too?
One of the things that I want to show in this comparison is that longer focal length will make a softer background, and hence better object isolation if that is what you wanted. Notice that with my tele zoom, the background is almost vanish. So want a portrait lens?Opt for longer focal length.
Extra: One other thing that this comparison shows by looking at the cat's face is that this lens has a better colours and contrast compare to a kit lens (In this case, a kit tele EF-S 55-250mm f/4-5.6 IS). I do noticed it, but I didn't make a dedicated comparison about it.
Fix instead of zoom?
My experience with fix lens is that I was first forced to zoom with my feet and by doing so, I became composition conscious. Every time I positioned myself and take a shoot, I became more critical with the result that I get. I was then forced to utilize what I got in my hand to make a better image, this is the very first advantage by using a fix lens to improve my photography.
"Limitation gives birth to creativity"
The second advantage that I realize is that by using the same focal length for sometime, I became so accustomed with this lens specific focal distortion and angle of view, so that whenever I walk and see some interesting scenes or things, I know immediately how I would compose it. It becomes a reflex, so I could walk and shoot fast and effortlessly.
Not to mention that all those hardcore Leica shooters always use fix lens, so there is no reason for an SLR shooter not being able to do so.
Some article from Mr. Rockwell that tells the same thing, but in more detail.
Should you get this lens too?
Want a light weight, indoor low light, good - build and image - quality, general focal length lens?this is it. 50mm cheap fix is too long for a general usage, a fancy zoom like EF-S 17-55mm IS USM is twice the size, twice the weight, and more than twice the price, and hence half the fun then this lens. Of course, some rich hobbyist will have no problem with the price, and willing to pay more for the zoom usefulness, but I don't. because I couldn't justify the more than twice expense for an EF-"S" lens with no weather sealing and middle class build quality. I prefer the 1 1/3 stop larger aperture, and the ability to shoot just with one hand (you don't need your left hand, because there is no zoom), I could just grab the camera from my bag, shoot, and put it back in with only my right hand. And I also prefer to shoot fix for the reason that I've told you above.
Some choose Tamron's or Sigma's 2.8 zooms, or Sigma's 30mm 1.4 fix. While I always prefer Canon lenses for its flawless compatibility, better quality control, certainly better build quality, better mechanics, better focusing, and not to mention that I can use this 28mm as a true wide angle low light lens if I happen to upgrade to FF in the future.
Some choose Tamron's or Sigma's 2.8 zooms, or Sigma's 30mm 1.4 fix. While I always prefer Canon lenses for its flawless compatibility, better quality control, certainly better build quality, better mechanics, better focusing, and not to mention that I can use this 28mm as a true wide angle low light lens if I happen to upgrade to FF in the future.

