Wednesday, June 15, 2011

My Only Vintage Photo Tool

Canon AE - 1 with Canon FD 50mm f/1.4 and my front yard reflected by the focusing system inside.
I borrowed this from my uncle last month. Its a Canon AE-1 manual focus SLR (No D, which stands for "D"igital on "DSLR"). After getting used to all-automatic DSLR - where I only need to set Auto ISO, AWB, +A3 / +A5 WB tweak, and P or AV occasionally - and just shoot with no concern, using this all-manual film SLR requires me some adaptation. Note that I said ALL-MANUAL, I have to set the shutter speed, and aperture manually, I have to focus manually, the ISO is of course determined by my choice of film, I have to roll the film manually, and I even have to pull the lever manually before each shot. The metering system is the only thing that is automated and require battery.
Look, no LCD, and there is the manual film roller at the top left
But using this manual old stuff - despite being far from convenient - is actually quite fun. Because I got the chance to experience the old-school shooting ergonomic - that is right index finger at shutter speed, and left index and thumb at focus and aperture ring - instead of using the right thumb and index to dial my 50D.

Black round shutter button, shutter speed dial control, film indicator, and the long film roll lever to set the shutter into ready position (I don't know what it called)
So the step to shoot with it is:
  1. Determine the shutter speed that you want to use with your right index.
  2. Look through the viewfinder and direct the metering area at the center to the area that should represent the mid-balance of the exposure (mid point of the brightest and darkest area of the frame) or to an area that you want/need to expose correctly.
  3. Look at the aperture needle at the viewfinder, that should point the aperture required for correct exposure, and set the aperture ring accordingly.
  4. In brighter condition, you have the freedom to choose the shutter speed and aperture accordingly to the effect that you desire.
  5. Focus to the area that you want to be in focus.
  6. Pull the lever with your right thumb.
  7. Shoot
A long and tiring process don't you think. But I guess I'll be able to adapt with the passing of time, and hence shoot faster with it.

All vintage metal body luxury instead of contemporary plastic capitalist economy. Look at the film roller at the top right
Other things that I like from this extinct species is that it is made with full-metal body, and the build quality if EXCELLENT!!. It's small, but heavy just enough to be comfortable in my hands and feels very solid too. It is far from the lunch-box-style plastic of the rebel class, or worse, the super rebel 1000D and 1100D class. I might even say that it's still better then my 50D in terms of solidness. The focusing ring of the FD 50mm is also very very solid, no play at all, and it's full metal too. My uncle claims that it's a very sharp lens with a very very nice tone, but I haven't seen the result yet, so I'll wait for my result before I say anything about it.
Canon FD 50mm F/1.4 completed with aperture ring, distance scale, and DOF meter
Look at the multiple-rectangular shape inside the lens. its the manual focusing screen, along with my front yard too.
Being impatient to give it a go, I bought the first film that I could find at Citraland Mall (CL) - The Kodak Color Plus ISO 200, 36 exp.


I bought Kodak because the Fuji at CL didn't sell film any more. Well, some says that Kodak colour is slightly warmer compare to fuji, which is good, because I like warm saturated colour. Now I'll only have to wait for shooting opportunity that worth the expense of my film. Yes, film is pretty much costly, because I need not only to buy the film, but also to process it, and scan it to digital for better storage. Kodak studio at CL provide film processing and scanning service, but I don't know the scanning quality though. I'll sure post the result here if I've finished the whole film roll and have it scanned.

Wow, I was first only intended to show the picture of this camera, but end up making a small review, I guess I'm naturally too chatty...Bah.

Thursday, June 9, 2011

Just Shoot and Go!

Is what I decide to change my blog title into. because The Executor sounds too serious. Serious is suitable for The Observer, because it really does talk about serious things, but not for this one.

And one more thing!

I decided that this contain mostly about photography, and also photos of places and things only. If I do take some pictures for articles that are not about photography or places, I'll probably still share it here, just to share the image and discuss the photographic aspect of it.

Canon EF 28mm f/1.8 USM

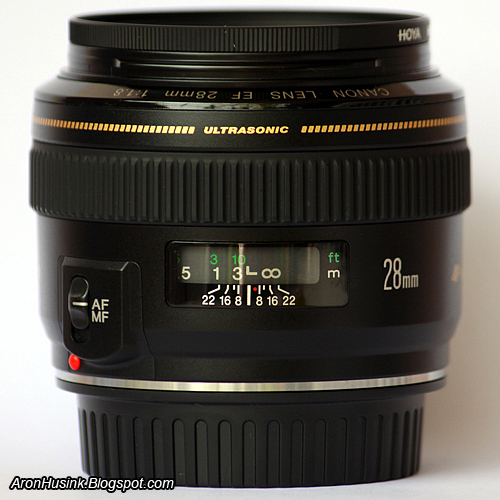
Canon EF 28mm f/1.8 USM with rear lens cap and Hoya UV HMC (c) 58mm filter
This is not a complete review, but after using this favourite - 90% of the time mounted on my 50D - lens  for almost a year, I think there are many things that I can share about this lens.

Why I bought this lens? 

My first lens was an EF-S 18-55mm II kit lens, it suffers me with its small aperture and hence the need for long exposure and/or high ISO when shooting in low light indoor. And since I bring my camera almost everywhere (some pro-photographer said to bring your camera wherever you go, that is one way to improve your photography), including when going out with my friends to malls or restaurants, I'll often shoot in low light indoor condition, and that was why at first I decided to hunt for a large aperture lens.

I had four candidates at that time, those are this lens (The most expensive of all candidates), the EF 28mm f/2.8 (Cheaper version of the lens), the EF 35mm f/2, and the cheapo 50mm 1.8 (Which I eventually bought too). Because I was looking for a replacement of my kit lens, I needed a lens would gave me a more of less normal angle of view - equal to 50mm in a full frame (FF) camera, and that would automatically exclude the cheapo 50mm - equal to 80mm if mounted on 1.6X crop camera. The choices were down to 28mm (44.8mm on FF) or 35mm (57.6mm on FF). I decided to go with 28mm, because 28 mm has a more pronounced wide angle focal distortion (I will make a dedicated article explaining this stuff) which will give me a chance for more creativity, compare to a flatter perspective - less focal distortion and hence boring - of 35mm.

After deciding that I'll go with a 28mm lens, it's time to determined how large the aperture that I'll need. So I do the math, I take a picture under a dim light (where I expect I'll shoot a lot in) with my kit lens, and make a calculation of how the high ISO or how long the exposure time that I'll need at f/2.8. I then conclude that f/2.8 isn't enough for me, that's why I go for the f/1.8.

Before buying it, I decided to do some research. I read a numerous amount of reviews, but eventually it was Mr. Rockwell's review that convinced me to go for this lens.

Am I happy with it after I get it?

The answer is YES. This lens is a lots lots of fun for many reason.

The most obvious reason is that I can shoot in any light with ease, and combined with my 50D's pleasant high ISO noise performance (Not as good as Canon's latest generation 18 mega pixels sensor, but still very nice) I never have to worry about my images noise level anymore. I just keep shooting and be happy because I know that my images are good.

The build quality and the mechanics are SUPERB. Excellent damping, no play at the focusing ring (better then 50mm f/1.4 USM, I've tested it). The metal mount fits perfectly with no play when mounted on my 50D (my kit lens on the contrary can be moved sideways easily when mounted). USM  focusing is very fast, silent and smooth, combined with 50D's focusing capability makes me able focus even in a bad light condition (my 400D will just keep hunting and couldn't focus at all in an unfortunate condition). No extending barrel, means not a pumper lens which means less dust gets in it (but it isn't weather sealed, so dust still do gets in sometimes).
Look at the internal rectangular flare stop, looks cool. Notice the green web-like reflection, it's my front yard haha.
The focal length is very useful. I can make almost any kind of shooting that I could get with my 18-55mm, I personally think the logic behind choosing a fix focal length is to choose somewhere in the middle of the zoom range of what you used to shoot with. It's wide enough to make an indoor group portrait, you can certainly use it to make a half body portrait, and - if you push it - a tighter portrait shoot without ruining the subject's face shape.


This is as tight as it gets, try to get closer and the face will look even weirder, even at this range it isn't that pleasant, but still tolerable.
 
It certainly also serves nicely as a landscape lens. If it's too wide, I could easily crop it via photoshop. Plus, the focal distortion means that I could  take a shoot with exaggerated depth, typical for a portrait landscape with a wide angle lens, and hence I don't miss my 18mm - wait, I lied, I still miss a wider focal length, but at least not that much. Check out my gallery, many of my images there were taken with this lens.

The focal distortion combined with a very large aperture means that I could isolate a small object with a still large bokeh-ish background. It is something that you can't do with a longer lens, because although they isolate the object better, they will also enlarge the background and hence blurred it even more. Here are some examples of what I mean.

Leaves from a coconut seed.
See how the leaves came forward toward us, this is due to the focal distortion effect. And with large aperture, combined with the ability to focus very close, the distortion is exaggerated, and the DOF become very shallow, and hence the blurry background.

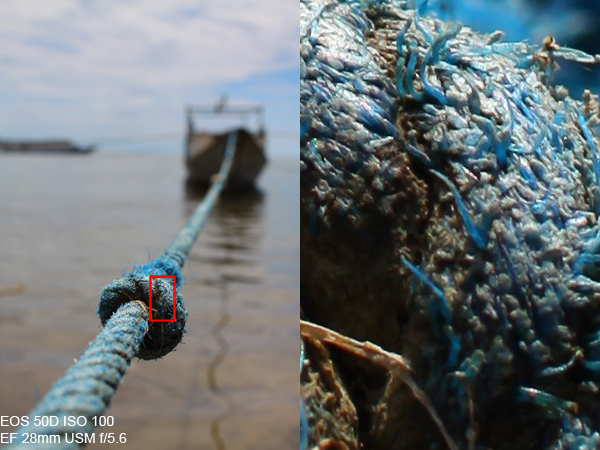
Knot of a rope that ties a boat
I love this picture, because I could emphasize the insignificant knot with the help of the large aperture. If I was using a longer focal, it would make the boat appear larger, and lessen the deeper perspective of the rope, and  at the earlier image, I would get viewer coconut seeds into my frame, and will produce an ordinary perspective image. Ordinary is boring.

What about sharpness?

See for yourself.
100% crop, no extra sharpening
Look at the skin pores from a not so sharp sensor of my old and sold 400D, and the amount of detail that I can pull out from such a small crop with my 15 mega pixels 50D. If I bother to sharpen it with photoshop smartsharpen tool, it would be much sharper. If I bother to shoot raw and sharpen it with Canon DPP, it would even much much sharper and cleaner.

Wanna go scientific with MTF chart? this lenstip.com review will tell.

Wide open at f/1.8 in a broad daylight, it will produce a glowy haze that make a soft image which is your own fault for shooting wide open at f/1.8 in a broad daylight.

Bokeh?
Bokeh comparison
I use a less then 10 cm tall object with far background to emphasize bokeh. The object is dangling around by the wind blow so don't look at the sharpness. The bokeh is generally good, it only become harsh if you have a harsh and crowded background like my front yard. At f/2.8, the heptagonal shape starts to show. look at those two earlier pictures, they show smoother bokeh.

One of the things that I want to show in this comparison is that longer focal length will make a softer background, and hence better object isolation if that is what you wanted. Notice that with my tele zoom, the background is almost vanish. So want a portrait lens?Opt for longer focal length.

Extra: One other thing that this comparison shows by looking at the cat's face is that this lens has a better colours and contrast compare to a kit lens (In this case, a kit tele EF-S 55-250mm f/4-5.6 IS). I do noticed it, but I didn't make a dedicated comparison about it.

Fix instead of zoom?

My experience with fix lens is that I was first forced to zoom with my feet and by doing so, I became composition conscious. Every time I positioned myself and take a shoot, I became more critical with the result that I get. I was then forced to utilize what I got in my hand to make a better image, this is the very first advantage by using a fix lens to improve my photography.

"Limitation gives birth to creativity"

The second advantage that I realize is that by using the same focal length for sometime, I became so accustomed with this lens specific focal distortion and angle of view, so that whenever I walk and see some interesting scenes or things, I know immediately how I would compose it. It becomes a reflex, so I could walk and shoot fast and effortlessly.

Not to mention that all those hardcore Leica shooters always use fix lens, so there is no reason for an SLR shooter not being able to do so.

Some article from Mr. Rockwell that tells the same thing, but in more detail.

Should you get this lens too?

Want a light weight, indoor low light, good - build and image - quality, general focal length lens?this is it. 50mm cheap fix is too long for a general usage, a fancy zoom like EF-S 17-55mm IS USM is twice the size, twice the weight, and more than twice the price, and hence half the fun then this lens. Of course, some rich hobbyist will have no problem with the price, and willing to pay more for the zoom usefulness, but I don't. because I couldn't justify the more than twice expense for an EF-"S" lens with no weather sealing and middle class build quality. I prefer the 1 1/3 stop larger aperture, and the ability to shoot just with one hand (you don't need your left hand, because there is no zoom), I could just grab the camera from my bag, shoot, and put it back in with only my right hand. And I also prefer to shoot fix for the reason that I've told you above.

Some choose Tamron's or Sigma's 2.8 zooms, or Sigma's 30mm 1.4 fix. While I always prefer Canon lenses for its flawless compatibility, better quality control, certainly better build quality, better mechanics, better focusing, and not to mention that I can use this 28mm as a true wide angle low light lens if I happen to upgrade to FF in the future.

Thursday, May 19, 2011

AF Micro-adjustment Using Moire Method

I've mentioned before that my EF 28mm f/1.8 USM lens suffers slight back focused haven't I? That's why last night I did some research about Canon AF Micro-adjustment feature and Holy Cow, I did find something interesting here, a method by Bart_van_der_Wolf, It works by exploiting the interference patterns or moiré between the R/G/B LCD elements and the camera's LCD elements when directly viewed with Life View (Copied directly from the author's post).

Most people adjust the focus accuracy using batteries as targets, I've tried this method not long after I got this lens, and it only gave me a sore eye, batteries are cylindrical in shape, I had a hard time determining which part of that cylinder should the focus point aim. Other more sophisticated hobbyist who really know what they are doing use a real chart like SpyderLensCal, they took several shots for each setting from -15, -10, -5, 0, +5, +10, +15 and determine three sharpest setting, and then they took another series of shots with narrower adjustment gap like -7, -6, -5, -4, -3, -2 to determine which is precisely the sharpest. Thorough, but takes plenty of time.

While I found that this Moire method is fast, efficient, and very accurate, heck, I didn't even need to take a single shot or compare any shot from the LCD. The first thing that you need to do is to download the chart designed to be used at the test here. Then set up the parameter, Set the target by displaying the chart with your LCD  at 100% magnification (or zoom). the benefit of using this technique is LCD - if viewed at correct angle - will give equal brightness across the screen, so there will be no exposure variation provided that you LCD works properly, and LCD is bright enough that you don't need additional lighting, you can do it indoor right at your computer desk with minimal fluorescent light.  Here is how it looks on your LCD:
Left: the whole chart; Right: 100% magnification
And now it's time to set your camera:
  • Determine the minimum distance for your particular lens using 50 X focal length formula (For my 28mm, it was 50 X 28 = 140mm ~ 1.4 meters, but I use around 1.7 meters just to be sure). 
  • Use tripod, make sure your camera are pointed directly perpendicular toward the LCD screen.
  • Use "one shot" focus mode, with center AF point only and make sure that the center AF point directed to the chart.
  • Go to live view, and play a little with the manual focus, you'll see some variation between these from your LCD:
Accurate focus
Miss-focus
Now you've seen the moire pattern from your camera LCD when the lens focus accurately, it gives a diagonal line, the pattern will differ depends on the lens and the LCD that you used. When I used my sister's MacBook, it gave me a criss-cross pattern instead of one direction diagonal pattern only. And you've seen that when its unfocused, the moire pattern will disappear, it has something to do with aliasing, high-pass filter, and bla bla bla... that I haven't check what they actually means (I plan on making a list of terms) One way to look at a perfectly focused moire pattern is to use the Contrast Detection-Live View AF, it slow, but 100% accurate, because it calibrates directly the level of contrast captured by the sensor where the final accuracy actually matters.
And now its time to calibrate, your central AF point phase-detection accuracy:
  • Get out of the life view > set the focus manually to infinity (or further if your lens doesn't have any distance scale) > half press the shutter to focus.
  • Go back to live view > zoom 10X > check the moire pattern, if its exactly the same with the accurately focused moire pattern, then Yeeeey, congratulation, your lens has no miss focus. you can make sure of it by trying several time, or doing a reverse test, that is by focusing with Live View first, then focus with your view finder, see if your lens distance scale is moving (or if the focus ring turns a little with no distance scale lens).
  • But after focusing with your center AF point and you don't get the moire pattern at your LCD, then your lens focus is slightly off, try several test to make sure (I'll discuss about repeatability  below) and play with the focus ring to determine if your lens focus is sightly backward or forward.
  • If your lens focused slightly backward, try several adjustment, start with +5, +10, or any point that gives you the best result judging from the moire pattern from you LCD. Same goes for forward focus.
  • After satisfied with the result that you get, you can recheck it with reverse test, that is to focus with Live View first, then the center AF point.
  • Remember to check the accuracy at different aperture, I used wide open (f/1.8 in my case), f/2.8, and f/5.6 according to Canon's recommendation.
 I'm very pleased to have found this technique, it's fast, efficient, and requires minimal resources (a SpyderLensCal cost Rp. 800.000,- at Focusnusantara, not to mention the need of a light meter). When testing my lenses, I found that my:
  • EF 28mm f/1.8 USM needs +15 adjustment,
  • The cheapo EF 50mm f/1.8 II needs NO (yes, its accurate from the start) adjustment at all.
I haven't test the EF-S 55-250mm yet because with such long focal length, I'll need a lot of space (10 meters for 200mm, and 12,5 meters for 250mm) not to mention that Canon recommends a test should be performed at the longest focal length for a zoom lens.
At last, a final note on focus calibration that I found important:
  • A miss focus issue can be caused by both lens and body flaw, so it is important to determine which is which. If you got several lens, and all of your lenses uniformly need the same amount of adjustment, then perhaps the flaw lies at your camera body. Its just a common sense.
  • Lens focus accuracy DOES vary a little, its normal, some lens will have a high degree of repeatability (which means its a good lens), while some misses more often, that is why it is important to check several time to be sure. If you want an in depth explanation about this, check here
  • One point in Canon AF Micro-adjustment probably wont matter much or perhaps almost at all at a wide or normal focal length, I only do the test at +5, +10, +15 with my 28mm and that is it. in the real world where most object that you shoot is in three dimensional shape, slight miss focus wont be noticed, but we are different, you may want a perfectly tuned focus down to the very minute detail, that is your preference. Well, this is a camera to shoot pictures, it is suppose to be a tools to have fun, not a billion dollars observatory star telescope or a bomber-fighter Jet shooting target finder, there are many many much much more important things to make a good picture then whether it focus on the eyelid, or the eyeball such as moments, composition, colors, and etc.
  • On the contrary to a wider lens, for a tele lens the adjustment has much more effect, but I haven't checked on this.
  • For your information, Canon will calibrate your lens for free three times during the warranty period, so you do have the choice whether to adjust it by yourself, or to send it to Canon.


Wednesday, May 18, 2011

Canon Datascript Focus Calibration

As I said yesterday, this noon I visited Canon Datascript authorized service center to calibrate my EF 28mm f/1.8 USM. Well, not that I found anything disturbing about its performance, but exactly Saturday May 14th 2011, the day when I bought the rookie 50mm and testing its focus accuracy with SpyderLensCal (The shop offered me to use theirs), I'm curious about my 28mm focus accuracy, so I setted the shoot mode to AV and used f /2.5 to get the shallow DOF so that the focus point can be easily defined, I used 0 EV, ISO setted to [Auto] and this is what I got.
SpyderLENSCAL
I increases the saturation a bit on the zoomed picture to exaggerate the spherochromatism - Its a color fringing at unfocused area common in fast lens, it will appear green behind, and magenta before the in-focus area, it's different from lateral color fringing - and you can see that the number that has no color fringing is number 1 (while it suppose to be at number 0) which means it focused slightly behind the intended point. I made 4 shots and all gave me the same result. I don't need to look at it from my laptop LCD, it can be easily spotted even from the camera body's LCD.

So I showed this result to Canon's technician, he brought the camera up their lab and done some testing. Finish testing my lens, he explain to me that the lens has no problem. He then enlightened me with some interesting fact about focus calibration which I'll share on a list:
  • Lens calibration should be done at f/2.8 and f/5.6 (but some source said that canon recommend to use the largest aperture possible, kinda conflicting).
  • The distance of the lens and the calibrator chart should be no less then 50 times the focal length. ex: my lens is 28mm, so the distance should be at least 1.4 meters. for a 50mm lens, the distance should be at least 2.5 meters - no luck if you are an American with silly inches, yards, and miles eh..hehe
  • The Chart must have equal brightness at the center and all four point direction. it has to be measured by a lightmeter, the value should be 8,5 and 10 for lens and body focus calibration respectively.
So looking by the fact that my calibration result was done in a store with dim florescent light bulbs and taken at almost closest focus distance, my result is definitely invalid. Here is an example of how Canon do it:
Canon Focus Calibration Chart
I have no idea why they use two kinds of lighting, but canon stated that they do it based on standardised procedure from Japan. And the fact that quite many consumers test the focus accuracy the way I did is why many people get a different result from what Canon get.

But the problem is, even viewing this result made by the technician I found that my lens does suffer some back-focus, the number 1 is sharper than number 0, so I think I'll fiddle a little with my 50D's microfocus adjustment. I just found some interesting link and article that might worth a try. Note that the technician mentioned that microfocus adjustment only works if your target is less that 3 meters. If you try to focus to infinity, it will ignore the adjustment. kinda strange, I'll check into it some other time.

Anyway, about my gallery, I haven't had any chance to hi-jack mu sister's Mac to process my images. My Acer's LCD sucks, so I refrain on doing any digital post-processing with it.

Tuesday, May 17, 2011

Product Photo with Modest Tools but Pleasing Result

Earlier today, I was screwing with my 50D coupled with my cheapo EF-S 55-250mm IS to shoot some "product photo" of my two other lenses, the favourite EF 28mm f/1.8 USM and the rookie EF 50mm f/1.8 II. I decided to do it today, because tomorrow, I plan on taking the 50D and the 28mm USM to Canon Datascript Service Center. My 50D needs its focus screen adjusted, it tilts slightly counter-clockwise so I can't use the 9-AF point to align the horizon, but other then that, everything actually works just fine. and my 28mm needs its focus accuracy calibrated. Three days ago at Focusnusantara as I buy the rookie 50mm, I also tested my 28mm focus accuracy, it turn out to be slightly backward 1 cm, and 1 cm is huge if you take a close shot of an object with large aperture. Tiny DOF wouldn't tolerate any miss-focus.

Back to my lenses photos, I know as a rule that to take a nice product shot, you have to use a long focal length, it gives a better perspective, never ever ever use a wide focal (less then 50mm that is) because your product will look distorted (and this focal-distortion is the reason why I bought a 50mm, I'll discuss this at my 50mm f/1.8 review) same goes for a serious portrait work. That's why I choose my cheapo tele to do the job. So I set my cheapo tele to 200mm, wide open at f.5/6. And I also prepared the scene, I placed my lenses on a chair, covered with white A4 paper to give the white background. I placed the chair at the terrace facing the garden so the 11-12 am light didn't shine directly to the scene and then I started to shoot.

Satisfy with the result, I transfer all the result to my old lousy ACER, and edited it in photoshop. I first fixed exposures and colours, and later I cropped, resized, smart-sharpened and name-tagged each of them. and to my surprise, the result is beyond my expectation. Here, see for yourself:

Canon EF 28mm f/1.8 USM

Canon EF 50mm f/1.8 II

Canon EF 50mm f/1.8 II, extended barrel

I have no studio, I use no build-in flash, no external speedlite. Heck, I got no lighting equipment at all, they are expensive and I'll rarely use them since I hate flash light. But apparently using only the modest resources like the white A4 paper, the Sun, and with the help of Photoshop CS4, I'm very pleased with the result. The smart-sharpen tools from CS4 with radius 0.2 and amount set to 150% really pumped out the image quality.

I shoot everything handheld. If I bothered to use tripod, used smaller aperture for better sharpness, and cleaned all the dust and speckle either at the lens or by photoshop, the result would've been much better. But who cares, I'm not a professional reviewer, I just wanna share a little experience I got with these tools of mine, so I thought I better use my own image.

Sunday, May 15, 2011

SlickPic and Fotokita

I've decided to give a go for SlickPic as my second gallery. I first noticed this site from Mr. Ken Rockwell. And after checking it out, I look that it has a nice layout. When you are about to make a gallery, you will surely want a site with beautiful layout and design. It makes your album and entire images looks better. Hummm...probably it is some sort of cheerleader effect..oh well..who cares.


Anyway, as I tried to logged in using my months ago subscribed account, I noticed that they also give options to login using your Facebook account, or your Google account. And since I had both of them, I was at first kinda confused whether I'll login with my Facebook account, google account, or should I just made a separated account. But when I first tried to logged in with separated account, they give the option to click "like on Facebook", so I clicked it and logged out. Then I tried to logged in with my Facebook account. Heck, it went right into my previous account. I don't know whether they noticed that both my Facebook and SlickPic account using the same Email, or they immediately linked it when I clicked "like", but they link my account immediately. But I'm still curious about logging it with my Google account, I thought "Hey, since my galleries will mostly related to this blog, why not use a google account instead". So I logged out again, and try to logged in with Google account. I though Holy Cow, they direct my account straight back to my previous account, because the "like" on Facebook still showing my Facebook profile picture. But  damn...apparently not, the Facebook "like" showed my profile because I'm still logged in to my both Facebook and Google with the same computer, that's all. but the Facebook account and the original account does merged into one - I've checked the account number, they are the same. But since facebook account and facebook related email is rather prone to get hi-jacked due to irresponsible link sharing traffic by those stupid alays - yes, I hate them - whom Facebook is really overpopulated with, it isn't wise to connect any of my blogging and photographic stuff with Facebook. So Google account it is.

My Fotokita Gallery is where I upload my NatGeo style images. Those are images with certain themes like landscape, nature, people, culture, travelling, or accordingly to monthly theme photo challenge by Fotokita. In fact, the monthly challege is one of the reason why I upload my images there. Each month they'll pick two images that is submitted to that particular challenge, and they'll publish them at National Geographic Magazine Indonesia. Cool huh, especially if you are a documentary freak like me. Other than getting your images published, they'll also give you a merchandise and a certificate. Well, getting published alone is already exciting for me. If my images do get published - "if" which means haven't till now - I'll buy three of NatGeo Indonesia's Mag, I'll cut the pages with my image in it, and put on a frame, the other one is for reading purpose, and the last one will go straight to my bookshelf, undisturbed...haha

Snapshot

A spontaneous start, that's why, a "snapshot". I've wanted to make this new blog since weeks ago, but never plan on when to do it. But suddenly - mid browsing - I just thought "I think I'll screw a little with Blogger's template design", and it turned into "oh well...screw with planning. Just make one now". So, here it is. And yes..new..its my second blog. You can find my first one from that link bar up there called "The Observer" along with other things like my Fotokita Gallery, and my still-non-existent other gallery.

Why a new blog?
Because I wanted to separate the contents of my posts. The Observer will discuss mainly about - well - observation. But this new boy here will be the place where I post things that I really do passionately - not just think and contemplate. Hence the name Executor (Inspired by Starcraft's Protos Executor...En Taro Zeratul!!)

And since what I really crazy about at these times is photography, most of the early post will discuss about photography, from tools to techniques, and of course sharing some of my result and experience. Heck, I now have an EOS 50D, EF 28mm f 1.8, EF 50mm f 1.8, and EF-S 55-250mm at my disposal, and will probably share my personal experience about my partner (the 50D) and his weapons (Lenses), and some technical stuff about photography too.

Of course, I'll write about other things, it depends on what I'm really into at that moment hehe. Well, we'll see, hope I'll have enough time to write those posts.

And damn, I've been off from blog writing far too long. My spontaneous writing skill and my "bloody sarcasm" are rusting...oh well...